DIY foam foundation repair works for small, flat concrete: a sidewalk panel, a step, a patio corner that dropped a little. A homeowner can drill a few holes and inject a two-part polyurethane foam to lift it. It does not fix a house foundation. Foam under a Houston house slab fills a gap, but the clay below keeps moving, and drilling a house slab carries real risks. This page covers what a foam kit can lift, how to do a sidewalk step by step, the safety side and when to stop. For how professional slab lifting works, start with mudjacking and slab lifting in Houston.
Can you fix a foundation with DIY foam?
Not a house foundation. Foam kits are sized for small concrete lifting jobs, and a house slab is a different problem. Under most Houston homes the slab moves because expansive clay shrinks and swells, so filling the void below with foam treats the symptom, not the cause. A sinking house usually needs piers, a permit and a contractor. Foam is a fair DIY tool only for flat work away from the house.
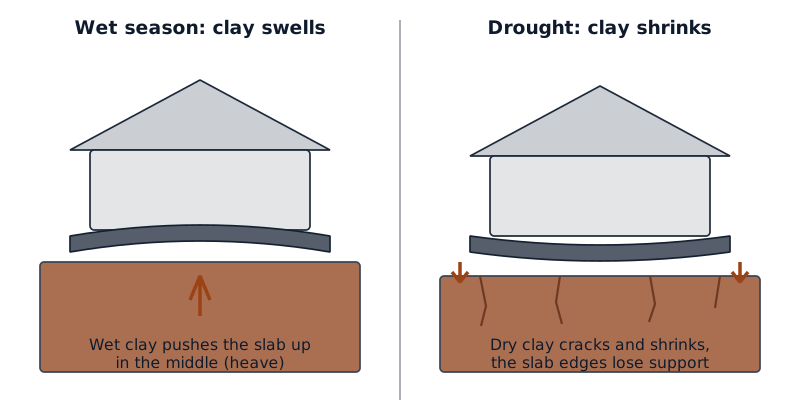
The USDA describes Lake Charles clay, the soil first mapped in Fort Bend County, as 45 to 60% clay that splits up to two inches wide and a foot or more deep in dry spells. A house slab on that soil rides the seasons. Foam can't hold the clay still.
There are two more reasons to keep a drill off a house slab:
- Tensioned cables. The Post-Tensioning Institute describes post-tensioned slabs as a solution for homes on shrink-swell soils. Their steel tendons are under high tension, and drilling blind risks hitting one.
- Pipes under the slab. A hole in the wrong spot can turn a lifting job into a plumbing repair.
Inside the City of Houston, foundation repair on a house runs under a building permit; the city's weekly permit reports list foundation repair permits every week. The broader limits of homeowner work are on DIY foundation repair.
What can a DIY foam kit lift, and what can't it?
A foam kit suits small slabs that dropped as one piece and sit away from the house: a sidewalk panel, a walkway slab, a single step, the corner of a small patio. It doesn't suit a house slab, a whole driveway, concrete that heaved up, concrete broken into loose pieces, or anything with a large hollow underneath. Those need heavier equipment or a different fix entirely.
| Job | DIY foam? | Why |
|---|---|---|
| One sunken sidewalk panel | Reasonable | Small, light, low risk if it cracks |
| A front step or stoop pulled away from the house | Possible, with care | Lift slowly; it sits against the house |
| Small patio corner | Possible | Check drainage toward the house first |
| Full driveway | Hire it out | Too much area to lift evenly by hand |
| Garage floor | Hire it out | Joined to the house slab and foundation |
| House slab | No | Deep clay movement, possible tendons, permit |
| Concrete pushed up by roots or swelling clay | No | Foam only lifts; it can't push down |
| Large void you can put an arm into | Hire it out | MoDOT limits foam to small voids because of material cost |
Professional crews use the same chemistry, but the Missouri Department of Transportation notes that foam lifting is usually contracted because specialized equipment is needed to mix and pump the two parts, with pressure and temperature controls.
How do you lift a sidewalk slab with foam yourself?
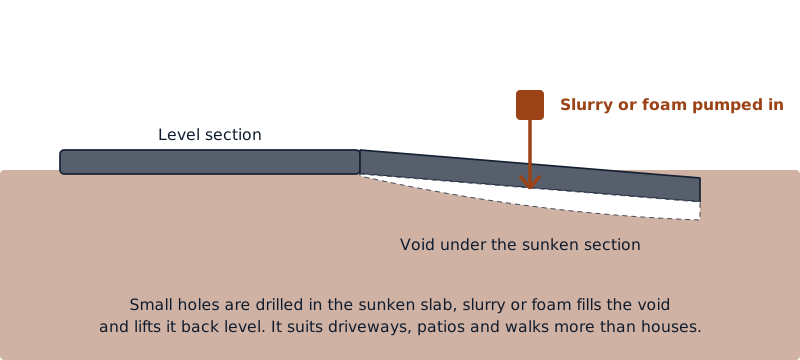
Find out why the panel sank, free it from its neighbors, drill small injection holes, inject foam in small shots while watching a level, stop just short of flush, then plug the holes and seal the joints. Most of the skill is in going slowly. Expanding foam can keep rising briefly after you stop, and a panel lifted too far cracks or tips.
- Fix the cause first. Look for a downspout, a low spot or a leaking hose bib sending water under the slab. Lifting without fixing it means doing the job twice. Foundation drainage covers the water side.
- Read the kit's data sheets. They give the mixing temperature, cure time and protective gear. Follow them over general advice.
- Free the panel. Clear sealant, grass and debris from the joints so the panel can rise without catching on its neighbor.
- Mark and drill the holes. MoDOT drills foam injection holes of 9/16 to 3/4 inch through the slab. Space them so foam reaches the low side first. Use a dust shroud or wet drilling and a respirator.
- Inject in small shots. Start at the lowest point and add a little at a time, moving between holes so the panel rises evenly.
- Watch the level constantly. A string line or a long level across the joint shows progress. Professionals use laser levels or dial gauges for the same reason.
- Stop a touch low, then patch. Let the foam cure for the time the data sheet gives, fill the holes with a cement patch, and seal the joints so rain stays out.
If foam appears somewhere unexpected, stop: the void is bigger than it looked.
Is DIY foam or DIY mudjacking easier for a homeowner?
For a single small panel, foam is usually the easier DIY route. The holes are smaller, the material is light and there is no grout to mix and pump. Mudjacking by hand means renting a grout pump, mixing a steady slurry and handling heavy material, which is why most homeowners hire it out. Foam brings its own catch: the chemicals need proper protection.
The grout method is set out step by step on DIY mudjacking concrete. For a homeowner, the practical difference is forgiveness: grout lifts slowly, while foam can overshoot in seconds. The full professional comparison is on polyjacking vs mudjacking.
What are the safety risks of DIY polyurethane foam?
The two big risks are chemical and dust. Polyurethane foam is made from isocyanates, which OSHA links to occupational asthma, chest tightness and irritation of the eyes, nose, throat and skin. Drilling concrete makes crystalline silica dust, which OSHA ties to silicosis, lung cancer and kidney disease. Wear the gear the product's safety data sheet lists, work outdoors and keep children and pets away.
In practice that means chemical resistant gloves, eye protection, long sleeves, the respirator the data sheet names, and wet drilling or a vacuum shroud for the dust. If you have asthma or have reacted to spray foam before, this is a job to hand over.
How much does foundation mudjacking or foam lifting cost compared with DIY?
This Old House puts professional mudjacking or slabjacking at $550 to $1,300 for a typical job, from national figures updated in 2026. A DIY kit saves part of that on one small panel, but you also buy or rent a drill and safety gear and carry the risk of cracking the slab. For a house foundation, piering runs $1,000 to $3,000 per pier in the same guide.
| Item | Typical range | Source |
|---|---|---|
| Professional mudjacking or slabjacking | $550 to $1,300 per job | National guide, 2026 |
| Piering or underpinning, house foundation | $1,000 to $3,000 per pier | National guide, 2026 |
| Permit for foundation work | $75 to $150 | National guide, 2026 |
| DIY foam kit | Varies by size; check the coverage on the label |
The numbers are a guide, and a written quote sets the real price. The full breakdown is on mudjacking cost in Houston.
When should you stop and call a foundation contractor?
Stop when the concrete is attached to the house, when the problem is inside the house, or when the lift goes wrong. Diagonal cracks above doors, doors that stick, floors that slope and gaps at the brick all point to foundation movement that foam can't fix. A cracked panel, foam surfacing in odd places or a slab that won't rise also means it's time for a professional.
A local foundation contractor can tell whether the slab or the house is moving, and whether foundation piers are the better answer than any lift. If you're not sure, we'll arrange a visit and you get a written quote before any drilling starts.
Questions people ask
How long does a DIY foam lift take?
A single sidewalk panel usually takes a few hours, most of it spent clearing joints, drilling and checking the level. The foam itself sets quickly, but the cure time varies by product, so follow the kit's technical data sheet before walking or rolling anything heavy across it. Allow extra time to patch the holes and seal the joints afterward.
Can you use canned expanding foam to lift concrete?
Household gap filling foam is a different product. It is made to fill cracks around windows and pipes, not to carry a concrete slab. Slab lifting foam is a high density, closed cell material that MoDOT also requires to be hydrophobic. Using gap filler under a slab risks a lift that soon sinks again.
Does a DIY foam repair need a permit in Houston?
A sidewalk or patio lift on your own property is small flat work, but repair to a house foundation inside the City of Houston runs under a building permit. If the concrete touches the house or supports it, treat it as foundation work. Outside the city, check with your own city's building department before starting.
Can foam fill the cracks in a sidewalk too?
No. Foam goes under the slab to lift and support it; it doesn't repair the crack in the surface. Once the panel is level, the crack needs its own filler or sealant so water can't run through it. The options for that are on filling cracks in a concrete slab.
The rest of our guides start from foundation repair across Houston.
Sources
- Missouri Department of Transportation, Engineering Policy Guide 570.5, Mudjacking (Slab Jacking)
- OSHA, Isocyanates
- OSHA, Crystalline Silica
- Post-Tensioning Institute, Slab-on-Ground
- This Old House, foundation repair cost guide (October 2026)
- USDA NRCS, Lake Charles soil series description
- City of Houston weekly building permit report, July 2024
Last changed